Cloud Native Buildpacks: Docker Images without a Dockerfile
Tony Messias
TL;DR
You can use Cloud Native Buildpacks to create Docker Images without having to write a single line in a Dockerfile.
You will need:
# From the root folder of your Laravel application, run the
# `pack build` to create your Dockerfile using Heroku's builder.
pack build \
  --builder heroku/buildpacks \
  --buildpack heroku/nodejs \
  --buildpack heroku/php \
  tonysm/buildpack-app

# Run your Docker Image.
docker run \
  --rm -d \
  --name=buildpack-example \
  -p 8000:80 \
  -e PORT=80 \
  tonysm/buildpack-app

# Now you can open http://localhost:8000 on your browser.

# To stop the container, run:
docker stop buildpack-example
Continue reading if you want to understand what's going on.
Containers
Containers might feel intimidating at a first sight, but it really isn't that complicated. First, containers are lies. The term "container" refers to a set of features from the Linux Kernel.
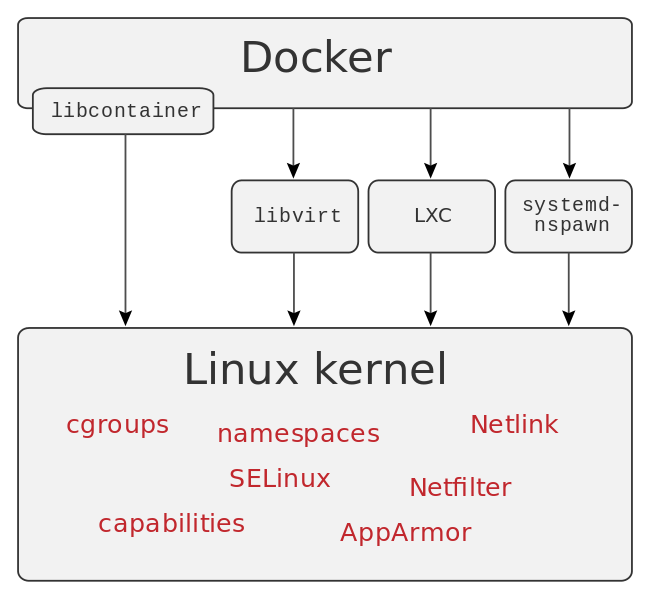
Source: https://en.wikipedia.org/wiki/Docker_(software)
A container is another way to package your application for distribution. It's kinda like when we used to zip our applications, send to a server, unzip it there, and run (*cough, cough* lambda, *cough, cough*). It's like a zip file or a tarball, but one where you can also add instructions on how to run the application.
All this fuss over fetching a tarball and executing the contents.
— Kelsey Hightower (@kelseyhightower) August 31, 2016
Docker Images
Docker is another umbrella term for a set of tools. In fact, Docker has so many goodies these days that Kubernetes recently deprecated using it to run containers. Don't worry, Docker isn't going away. Kubernetes is just not going to use it to run containers. Docker these days has a lot of things built-in, much more than what Kubernetes needs to run a container. That's the only reason they are favoring other container runtimes.
For building container images, Docker is still King. There are many ways we can create Docker images. You could spin-up a container using an official Ubuntu image, run your commands inside the container and then commit your changes to create your image manually. Or you could write a Dockerfile, like so:
FROM ubuntu:20.04

LABEL maintainer="Taylor Otwell"

ARG WWWGROUP

WORKDIR /var/www/html

ENV DEBIAN_FRONTEND noninteractive
ENV TZ=UTC

RUN ln -snf /usr/share/zoneinfo/$TZ /etc/localtime && echo $TZ > /etc/timezone

RUN apt-get update \
    && apt-get install -y gnupg gosu curl ca-certificates zip unzip git supervisor sqlite3 libcap2-bin libpng-dev python2 \
    && mkdir -p ~/.gnupg \
    && chmod 600 ~/.gnupg \
    && echo "disable-ipv6" >> ~/.gnupg/dirmngr.conf \
    && apt-key adv --homedir ~/.gnupg --keyserver hkp://keyserver.ubuntu.com:80 --recv-keys E5267A6C \
    && apt-key adv --homedir ~/.gnupg --keyserver hkp://keyserver.ubuntu.com:80 --recv-keys C300EE8C \
    && echo "deb http://ppa.launchpad.net/ondrej/php/ubuntu focal main" > /etc/apt/sources.list.d/ppa_ondrej_php.list \
    && apt-get update \
    && apt-get install -y php8.0-cli php8.0-dev \
       php8.0-pgsql php8.0-sqlite3 php8.0-gd \
       php8.0-curl php8.0-memcached \
       php8.0-imap php8.0-mysql php8.0-mbstring \
       php8.0-xml php8.0-zip php8.0-bcmath php8.0-soap \
       php8.0-intl php8.0-readline \
       php8.0-msgpack php8.0-igbinary php8.0-ldap \
       php8.0-redis \
    && php -r "readfile('http://getcomposer.org/installer');" | php -- --install-dir=/usr/bin/ --filename=composer \
    && curl -sL https://deb.nodesource.com/setup_15.x | bash - \
    && apt-get install -y nodejs \
    && apt-get install -y mysql-client \
    && apt-get -y autoremove \
    && apt-get clean \
    && rm -rf /var/lib/apt/lists/* /tmp/* /var/tmp/*

RUN setcap "cap_net_bind_service=+ep" /usr/bin/php8.0

RUN groupadd --force -g $WWWGROUP sail
RUN useradd -ms /bin/bash --no-user-group -g $WWWGROUP -u 1337 sail

COPY start-container /usr/local/bin/start-container
COPY supervisord.conf /etc/supervisor/conf.d/supervisord.conf
COPY php.ini /etc/php/8.0/cli/conf.d/99-sail.ini
RUN chmod +x /usr/local/bin/start-container

EXPOSE 8000

ENTRYPOINT ["start-container"]
This example was taken from Laravel Sail. It installs a bunch of dependencies the application needs to run, some instructions to the image users (us), such as the exposing port, and some instructions for the container runtime, such as the entrypoint that will receive commands for this container.
That's the common way. There is another way, though. What if I told you we don't need to write a single line of a Dockerfile to create a Docker Image? Enters Cloud Native Buildpacks.
Cloud Native Buildpacks
You might have used Heroku already (or at least heard of it). Heroku is a platform where you can deploy your applications to. Its unit of work are called "Dynos", and you can deploy to Heroku using a regular git push command. Turns out Heroku uses the container model. When you do a git push they will essentially package up your application source in a container for you. The key-point is that you don't even need to know that. Well, most of the time.
They are able to do that using buildpacks. Buildpacks detect which engines your application use and is able to "guess" how to run your application. Let's create a Docker Image without a Dockerfile. You need to install the pack CLI tool. Follow their instructions to get it installed on your machine. You'll also need Docker, of course.
Now, let's create a Laravel application and try using Heroku's builder:
# Create a Laravel app.
laravel new --jet --stack=livewire --teams example-app

# Create the Docker image.
pack build --builder heroku/buildpacks tonysm/buildpack-app
If you look at the output, you will see how the Heroku builder tries a bunch of buildpacks until one of them returns positive for the detection. The detection rules might be as simple as checking if you have a package.json file for the NodeJS buildpack, for instace.
And... that's it, actually. Well, kind of. Let's try running this container image locally:
docker run \
  --rm -d \
  --name=buildpack-example \
  -p 8000:80 \
  -e PORT=80 \
  tonysm/buildpack-app
If you try to open http://localhost:8000 in your browser, it won't quite work yet. We need one more thing to make it work: a Procfile. This file will be used to describe our process model. Let's create it:
web: heroku-php-apache2 public/
Here we're instructing the builder that we want a process called "web" and this process will run the heroku-php-apache2 public/ command as its entrypoint. We mainly needed this file now to tell the heroku-php-apache2 binary to serve the public/ folder.
We could have as many processes in our Procfile as we need. We'll explore that soon. For now, let's try running our app again. We need to stop the running container first.
docker stop buildpack-example
Since we used the --rm option when running the container, it's completely gone now. We can now build it again and try to run it:
pack build --builder heroku/buildpacks tonysm/buildpack-app

docker run \
  --rm -d \
  --name=buildpack-example \
  -p 8000:80 \
  -e PORT=80 \
  tonysm/buildpack-app
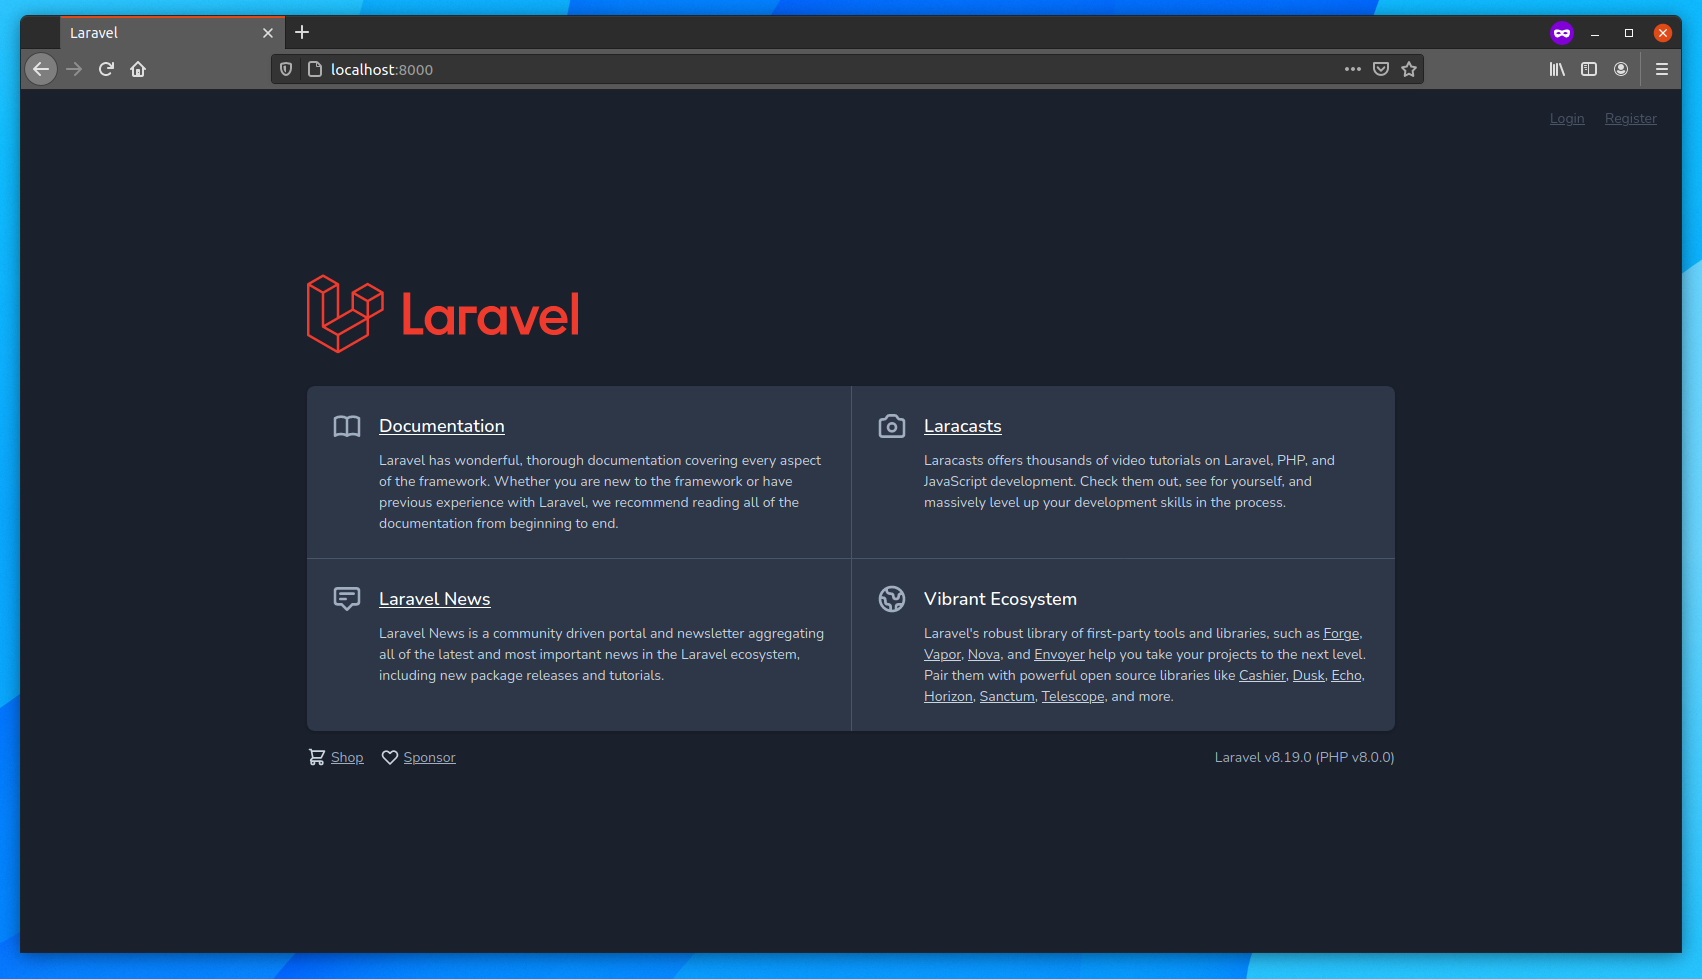
Now, let's try it on the browser again and... voilà!
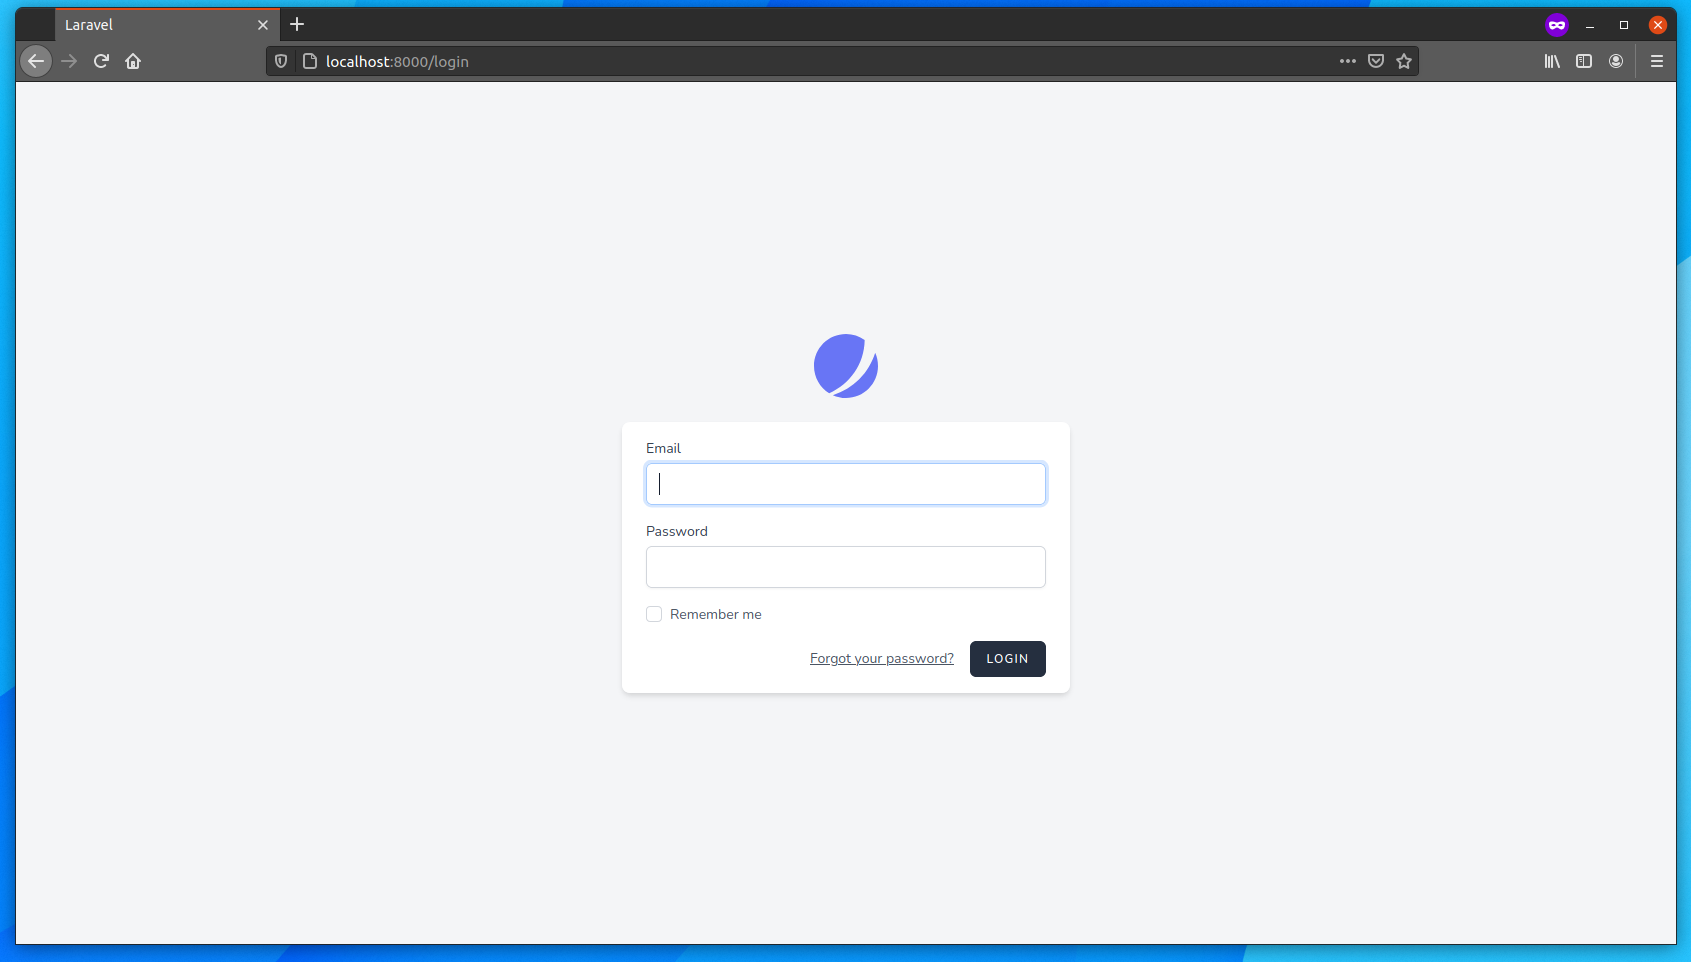
Looks like we're done, but if you try to load the login or the register routes, you will see a "Mix manifest does not exist" error. That's right. The builder didn't install and compile our dependencies for us. Let's do that. We have been relying on the "auto-detection" feature of Heroku's builder, but we can help it. We can even combine different buildpacks to create our image. Let's instruct it to use the NodeJS buildpack and the PHP buildpack after that.
Before we do that, we need to instruct the NodeJS buildpack to also compile our assets for us. The NodeJS buildpack will look for an run a build NPM script on your package.json file (if you have a non-related build script already, you can add a heroku-build script, which will be used instead). Add the following line to it:
{
    "scripts": {
        "prod": "...",
        "build": "npm run prod"
    }
}
Now we can build our image using both buildpacks:
pack build \
  --builder heroku/buildpacks \
  --buildpack heroku/nodejs \
  --buildpack heroku/php \
  tonysm/buildpack-app

docker run \
  --rm -d \
  --name=buildpack-example \
  -p 8000:80 \
  -e PORT=80 \
  tonysm/buildpack-app
Now, if you try to access the login form, you will no longer see the "Mix manifest missing" error.
The form doesn't work as is. That's because we would need to run a database and configure the container to talk to that DB, but that's not the scope of this article.
Multiple Processes
As I mentioned, we can have multiple processes described in our Procfile, as many as our application needs. Let's create a console command in Laravel and add another process entry to our process model. If you want to know more about this process model, I recommend checking out this article.
First, edit your routes/console.php file and add the following lines:
Artisan::command('test:proc', function () {
    $run = true;

    pcntl_async_signals(true);
    pcntl_signal(SIGTERM, function () use (&$run) {
        $run = false;
        $this->comment('Shutting down...');
    });

    while ($run) {
        $this->comment('Testing');

        sleep(1);
    }

    $this->comment('Bye!');
})->purpose('Displays a message to test the process model.');
Second, edit the Procfile and add another process called worker, like so:
web: heroku-php-apache2 public/
worker: php artisan test:proc
Lastly, let's build this image again:
pack build \
  --builder heroku/buildpacks \
  --buildpack heroku/nodejs \
  --buildpack heroku/php \
  tonysm/buildpack-app
Now, the builder will create one binary file you can use as the entrypoint when running the command. You can see the default entrypoint by inspecting the image:
docker image inspect tonysm/buildpack-app

# ...
            "Entrypoint": [
                "/cnb/process/web"
            ],
# ...
I think the first process in your Procfile will be used as the default entrypoint. If you inspect the container, you will see the other binaries with the names we gave in the Procfile also living in the /cnb/process/ folder. To run our test:proc console command, we need to point the worker binary in that folder as the entrypoint, like so:
docker run \
  --rm -d \
  --name=buildpack-example-worker \
  --entrypoint /cnb/process/worker \
  tonysm/buildpack-app
This will get your worker running in background, now you can read its logs by running:
docker logs -f buildpack-example-worker
Nice! If you don't specify the entrypoint, your container will start the first process defined on your Procfile.
To stop the worker, run:
docker stop buildpack-example-worker
Conclusion
I wanted to show you how we can make use of Cloud Native Buildpacks to build our Docker images without having to write a Dockerfile. Hope this was useful.